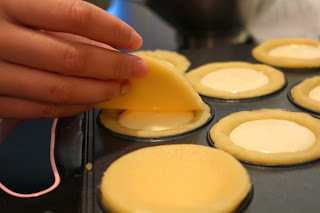
This dessert was a LOT of fun to photograph and make because I had my cousin Cindy over to help bake. We usually have these baking dates, but this is the first one I've blogged about. She's been very busy with exams and recently finished so we decided to get together to catch up and bake :)
Cream Cheese Tart Filling
Cindy and I opted to proceed with an easy cream cheese filling recipe - as we didn't have many complex ingredients. After much research, we came across a recipe that fit. The original recipe modified from Paula Deen's Cherry Cream Cheese Tarts.
- 1 package of cream cheese, softened to room temperture
- 1/2 cup sugar
- 1/2 teaspoon of vanilla extract
- 1 egg
2. Add sugar gradually, add vanilla.
3. Add egg.
4. Spoon cream cheese mixture over pies.
Step-by-Step Directions
1. Beat cream cheese until light and fluffy:
2. Add sugar gradually and mix.
3. Add the egg, and mix.
4. Mix, and set aside to start on the sweet tartlet shells:
Sweet Tartlet Shells
Most people opt to use pre-made shells or "bake-ready" tartlet shells from the grocery store. Cindy and I opted to make the tartlet shells from scratch. Original recipe is from Epicurious.
- 1 stick unsalted butter, room temperature softened
- 1.5 cups all-purpose flour
- 3/th cups of confectioner's icing sugar
- 1/4 teaspoon salt
- 2 egg yolks
- 1.5 tablespoons ice water
- 1/2 teaspoon vanilla.
2. Gradually add butter.
3. In a separate bowl, mix together yolks, ice water and vanilla, add this tablespoon-wise to the flour mixture.
4. Form a dough and refrigerate for 1 hour or up to 1 week - this step is important.
Step-by-Step Directions
1. Blend flour, confectioner's sugar and salt until well combined. Gradually add butter. You should get a "cereal/fine" texture.
2. In a separate bowl, mix together yolks, ice water and vanilla, add this tablespoon-wise to the flour mixture. This should produce a dough

3. Roll into two balls and refrigerate for 1 hour or up to 1 week. I used the time during refrigeration to create the cream cheese filling.
4. After refrigeration, using rolling pin to flatten out dough and use a circular tartlet cutter to roll out pieces.
5. Place the cut out dough pieces into the Babycakes Cupcake Maker, and use the tools to push/shape the tart.
6. We found 1.5 tablespoons of filling fit well into the tart:
7. Optional: Cover tarts a 2nd tart dough layer (smaller circle):
8. Bake for 12 minutes with Babycakes Maker, until pie tartlet is golden brown:
9. Allow to cool, and garnish with fresh fruit:
Overall this recipe was a lot of fun to put together, for Cindy and I it was the first time we ever baked "tarts". I imagine without the Babycakes Maker we would have used small tart aluminum cups and baked for a longer priod of time in the oven.
We had a lot of fun putting together the "setup" for the final pictures and even discussed the idea of putting together a "Health and Fitness Blog".


No comments:
Post a Comment